

![]()
![]()
![]()
When I was using Windows Media Center, I was able to program my Logitech Harmony universal remote controls to control my Z-wave lights and devices in Micasaverde Vera, I wrote about that back here. And also here for mControl.
Basically the idea is this – Program your Logitech Harmony to send keyboard shortcuts to your HTPC via IR or with the RF extender. Your HTPC in response then runs a script to send a http request to your home automation system to do something, like turn on some lights or control a device in your home. I still think its a brilliant idea and whilst using your HTPC you can turn your bog standard IR universal remote control handset in to a Z-wave / Home Automation remote control handset !
Since I moved to OpenElec XBMC I have lost this feature until now! There are no other how-to or guides on the Internet that talk about this topic directly? not that I have seen anyway’s and as my Linux programming skills are not great, I have had to battle through and cobble it all together myself. If you are more proficient in Linux then you may well spot some ways of improving what I have done, so please feel free to leave your comments.
I have this working currently on only one of my HTPC’s this is an Intel based mini ITX board using the CIR header and an Inteset CIR receiver board. I am using OpenElec 4.0.3 Gotham. The break through came when I discovered this thread here, which talks about enabling the mce_kbd IR protocol in Linux (MCE Keyboard). As without this the QWERTY keyboard shortcuts just don’t work and are not seen.
Here is an over view of the steps required and what I will be covering in this blog post.
1. Enable the mce_kbd IR protocol in Linux
2. Figure out what http commands you need to send to your Home Automation controller (Vera)
3. Create the script files XBMC will run to send the http request to the Home Automation controller
4. Create / Tweak the XBMC keyboard.xml keymap file to add support for your new keyboard shortcuts in XBMC
5. Program your Logitech Harmony remote with the new keyboard shortcuts (MCE IR Keyboard required)
6. Test, hope it works and if it does, sit back and think WOW nice one CW-KID!
OK before we start just a word about the Logitech Harmony software there are several devices / profiles in the database relating to MCE:
- Windows Media Center SE
- Windows Media Center (EU)
- Media Center Extender
- MCE Keyboard
Are just the ones I know about. I am using the “Windows Media Center SE” device. When using the MCE Keyboard profile I had big problems with the command being sent multiple times over and over so I don’t recommend you use that profile. Also there may be ways to do this without actually owning a MCE IR keyboard and using the pre-defined keyboard shortcuts in the Harmony MCE profiles. However I think if you have Logitech Harmony’s then you should have one of these MCE IR Keyboards. So you can teach your Harmony any keyboard shortcut combination you wish, so I recommend you just buy one if you haven’t got one. This will also give you much greater scope for creating many new keyboard shortcuts such as Ctrl+Alt+A to Ctrl+Alt+Z and many more etc 
1. Enable the mce_kbd IR protocol in Linux
Until you do this your just pissing in the wind trying to send IR keyboard shortcuts, believe me I know. Use Putty to SSH in to your OpenElec PC, if you don’t know how to do this use Google.
Enter this command:
echo +mce_kbd > /sys/class/rc/rc0/protocols
then type ir-keytable –v
If you are in luck you should see a line that says: /sys/class/rc/rc0/protocols protocol mce_kbd (enabled) 
This worked on one of my HTPC’s with the Inteset CIR receiver board but did not work on another HTPC which has an iMon VFD/IR I’m still investigating that issue. Can you help me here?
OK so now you need to add this command in to your OpenElec autostart.sh script file. If you haven’t got one follow the wiki here to create one. This will ensure that this command is run each time you turn on your PC.

2. Figure out what http commands you need to send to your Home Automation controller
I am basing this on Micasaverde Vera as that is my Home Automation controller, however this should work for any HA controller that can accept HTTP commands. I know it will work with mControl for example and probably many others like HomeSeer.
If you see my previous blog post here I talk about how to figure out what the http commands are to control devices and scenes. So I am just going to copy and paste from that previous post and tweak it a little bit to save myself some time.
Turning a Z-wave device on and off
Here is an example HTTP command which turns on my Lamp (Left) device in my living room. You need to know what your DeviceNum is?
There are two ways to work out the device number, you can go to the Vera UI in a browser find the device in question, click the spanner icon and then go to the settings tab. You can see that this Lamp (Left) device is ID 3 and DeviceNum=3 in the above HTTP string to turn on this device. 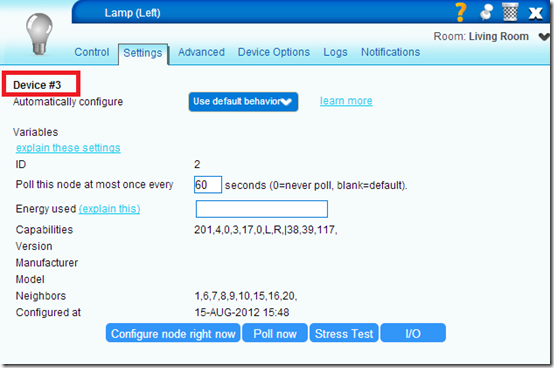
The second method of listing the ID numbers for all your devices and scenes in Vera is to use the URL below, which displays a page of XML with all the information in it. Change IP-Address for the internal IP address of your Vera box.
http://IP-Address/port_3480/data_request?id=lu_sdata&output_format=xml
This example HTTP command turns off the Lamp (Left) device:
Note:
SetTarget&newTargetValue=0 = OFF
SetTarget&newTargetValue=1 = ON
To test your Vera HTTP commands you can just run them in a browser and the Z-wave device should respond. Obviously you need to change the IP address 192.168.1.100 to the IP address of your own Vera unit.
Run a Vera scene
In this example we are going to look at a HTTP command to run a scene in Vera. Again first you need to know the scene number of the particular scene you would like to create your script file for. My scene is called “Lounge On” if I look at the scene in Vera I can see its number is = 1 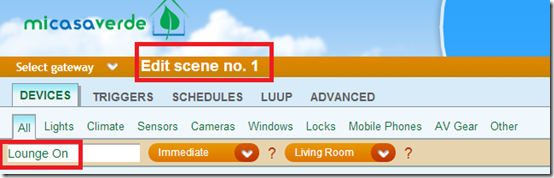
Or if I look at the XML code from the URL I mentioned above, I can see its id=1 <scene active=”0″ name=”Lounge On” id=”1″ room=”1″/>
So now I know the ID number of the scene I want to create a script file for, I can use the HTTP command below, note I have the number 1 at the end: RunScene&SceneNum=1
If my scene had an ID of 5 I would change this to be RunScene&SceneNum=5 etc.
HTTP Command to run a Vera Scene:
3. Create the script files XBMC will run to send the http request to the Home Automation controller
OK so now we need to look at creating the script files for XBMC to run which will contain our http commands to be sent to the Home Automation Controller.
To do this I created a python script which runs a curl command to send the http request to the home automation controller.
Create the python script file
I am using EditPad Lite as my notpad editor program. Create a new file and paste in this code and use your own http command for Vera:
#!/usr/bin/env python
import subprocess
proc = subprocess.Popen(["curl", "http://192.168.1.100:3480/data_request?id=lu_action&serviceId=urn:micasaverde-com:serviceId:HomeAutomationGateway1&action=RunScene&SceneNum=1"])
and save it as a .py file I called mine lounge-on.py
As you can see the lounge-on.py script file sends the http request to Vera using curl. In this example my http command will run a scene with ID=1 which is my lounge lights on scene.
Also worth noting now, I am saving all my script files in this location on the OpenElec PC: /storage/.xbmc/userdata/vera/
I just created a new sub-folder called vera via the OpenElec samba shares 
OK at this point we can now test its working? To do this we need to run the python script.
type: python lounge-on.py and press enter 
It should say OK and your lights should have just been turned ON in your room!
So now what? Well you need to repeat this process of creating these python script files for each Vera scene or device you want to control. So I now need a lounge off script.
lounge-off.py
#!/usr/bin/env python
import subprocess
proc = subprocess.Popen(["curl", "http://192.168.1.100:3480/data_request?id=lu_action&serviceId=urn:micasaverde-com:serviceId:HomeAutomationGateway1&action=RunScene&SceneNum=2"])
You can see my lounge off scene in Vera has an ID=2 / SceneNum=2
Now in terminal I can test the lounge-off.py script by running:
python lounge-off.py

Again it says OK and now my lights have just gone OFF.
4. Create / Tweak the XBMC keyboard.xml keymap file to add support for your new keyboard shortcuts in XBMC
Now we need some way for XBMC to be able to run the python .py script files, when we press our keyboard shortcuts / send them from the Harmony IR remote control handset.
Look in this folder on your OpenElec PC: /storage/.xbmc/userdata/keymaps Is there a keyboard.xml file in there? If not you will need to copy the master / default file from the system: /usr/share/xbmc/system/keymaps in to your /storage/.xbmc/userdata/keymaps folder
For example this command in terminal would copy the default keyboard.xml file in to your userdata/keymaps folder
cp /usr/share/xbmc/system/keymaps/keyboard.xml /storage/.xbmc/userdata/keymaps/keyboard.xml
Now we need to edit the keyboard.xml file to add in support for our keyboard shortcuts in XBMC, so I opened it in my EditPad Lite editor. 
You can see in the global section at the top I have added two lines of code, highlighted in the red box. I wanted my keyboard shortcuts to be CTRL+ALT+(LETTER) for example CTRL+ALT+A and CTRL+ALT+B
That’s what this part of the code is <A mod=”ctrl,alt”> a modifier for CTRL+ALT+A
We then RunScript and call the python script RunScript(/storage/.xbmc/userdata/vera/lounge-on.py)
and close with </A>
Save the keyboard.xml file and reboot your OpenElec PC for the changes to take affect.
So what this means if I press CTRL+ALT+A on a keyboard XBMC will run my lounge-on.py script. And when I press CTRL+ALT+B XBMC will run my lounge-off.py script.
5. Program your Logitech Harmony remote with the new keyboard shortcuts (MCE IR Keyboard required)
OK we are getting there, now we need to teach our Logitech Harmony remote control handset the keyboard shortcuts i.e. CTRL+ALT+A and CTRL+ALT+B
In the Harmony software or via the online myharmony.com site depending on which Harmony remote you have (I am using the Harmony software and a Harmony 895 remote).
Connect your Harmony remote via the USB cable to your workstation PC and then go to the Media Center PC device and select learn IR

Scroll down to the bottom and under Learn a New Command enter a name for your new command and click the Learn New Command button

You will then see this screen. 
Now position your Harmony remote control handset and your MCE IR Keyboard, so you can teach the Harmony remote the new keyboard shortcut. 
Press the keyboard shortcut you wish to teach the Harmony in my case CTRL+ALT+A The Harmony software should then say Key Detected 
It will then ask you to enter the keyboard shortcut a second time to confirm it.
Now on the Media Center PC device select Settings 
Select Customise Buttons

Select the Additional Buttons tab and scroll to the page on the LCD screen where you would like to add your new custom buttons. Type a name for your new button “Lounge On” and in the drop down list select the new command you just taught your Harmony “LoungeOn”

Repeat this process and teach your Harmony the other keyboard shortcuts and create new buttons on your Media Center PC device LCD screen.
You will probably also want to edit your Media Center PC activities and add the new custom buttons to those activities as well.
Finally update your Harmony remote in the Harmony software.
These are two photos of the new buttons I have added onto my Harmony 895 LCD screen. 

These are the new lines of code I ended up with in my Keyboard.xml file, I used CTRL+ALT+A to CTRL+ALT+K

Now point your Harmony remote at your OpenElec XBMC PC and press one of your new custom buttons, if its all working your lights should come on / off etc.
Summary
I’ve only got all of this working today on one of my HTPC’s and I’ve not had much time to test it, but so far it is working flawlessly, I press a button on the Harmony and my lights react immediately. I’ve also wrote this blog post quickly and I hope there are no serious errors, but all of this in Linux for me is still really a work in progress!
If you are a Linux guru? Please look at this post here I need help enabling the mce_kbd IR protocol on my other HTPC which has the iMon VFD/IR. If anyone wants a copy of my .py script files? Let me know and I will post them up on the net some where.
Update: Check out PART TWO here, I have added feedback pop-up notifications in to the XBMC user interface, so you know if the python script has been run by XBMC.